Image Map
place holder
Showing posts with label The Homestead Project. Show all posts

Jan 5, 2015

Homesteading & Technology: 5 free apps for today's homesteader


First off, let me wish you all a very happy New Year, filled with all things bright and beautiful!
Welcome back from the holiday festivities and into a new year of homesteading activities.

Now, let's get on with the homesteading show (so to speak)...

Today's homesteader has a world of resources at their fingertips: blogs, digital libraries, print libraries, county extension offices, aunt Gertrude and many more.  If you're semi-techie (like me) you probably have a smartphone or a tablet lying around, so now you can keep a pocket resource in the form of apps as well.  I personally like the iPad so the following list of apps is iOS based (sorry android users but I hope you can find them in your app store too).

So here we go, the 5 FREE apps I've found useful in our homesteading venture are:


1.  Flipboard - This app is like a personal magazine/newspaper.  You can customize it to follow a broad range of topics and interests - including homesteading!  It's visually appealing, easy to setup and very pleasant to read.


2. Vegetable Garden Calculator - A very handy little app for helping calculate how many plants you will need to feed a given number of people.  Old pros may not find this one quite as thrilling but for newbies like me this is a great little tool to have.


3.  GardenMinder - Nifty app for helping to plan raised-bed gardens.  It will allow you to layout the garden beds and keep a journal with notes and pictures of each garden right in the app.  It also features automatic weekly reminders that are based on the frost dates for your area and the specific crops you are growing.


4.  Grow Your Own Organic Herbs - easy to use quick-reference tool that provides tips and advice for growing organic herbs.


5.  Newsify - This is similar to Flipboard but also works as an RSS reader allowing you to keep up with all of your favourite homesteading bloggers from around the country and the world.  Laid out in a lovely, easy to read format - imagine all that homesteading goodness right there at your fingertips.


So there you have it, my choices for 5 free homesteading apps!  I hope you find these useful and if you have some other apps that you use often in your homesteading endeavors feel free to let us know in the comments area!


this post may have been shared at one (or all) of these wonderful blog hops!

Nov 10, 2014

Unintentional lessons in food preservation

Mr. Newbie and I are very fond of hiking and camping in the late spring and autumn months and toward this end we decided several years ago to put up some dehydrated foods that we could take along with us on the trails.  We were able to enjoy the fruits of our labor (punn intended) and felt a great sense of satisfaction in having learned a skill that would put us in good stead in our future endeavors. 

While recently clearing out some items we had in storage, we found that several packages of these dehydrated fruits had unintentionally been stored away.  What a great opportunity to have a little homesteading test of our food preservation.  We had followed the general rule of thumb when dehydrating fruits.  They were dried until they had a pliable, leathery texture.  We packaged them in freezer bags with oxygen absorbing packets. 

First we unpacked the dehydrated mangos

Condition of packaging: like new.
Texture: leathery
Smell: faintly arromatic
Taste: rather bland with a slight after-taste of mango


Next came the apples

Condition of packaging: like new.
Texture: leathery
Smell: non-existent
Taste: very bland with no aftertaste.
This was easily our most successful carry-over along with our tea-mix that consisted of apple bits, apple and orange peels.


Condition of packaging: like new.
Texture: leathery with very dry orange peels
Smell: slightly fragrant smelling of orange
Taste: very faint orange flavor.


Next followed the three least successful:

Pineapples which tasted mildly unpleasant and were followed by
Strawberry which along with the below pictured banana slices were inedible, somewhere between burnt coffee and the actual flavor of the fruit.
The positives:  we learned that the oxygen absorbing packets work very well creating an almost vacuum-sealed packet.

The negatives:  Taste...  While I believe the quality of the fruits remained and they were not spoiled in any way, the flavor of the fruits did not hold up over the span of time they were in storage. 


Lesson learned:  Properly dating the food storage bags is very important.  While our home-dehydrated fruits were very tasty when first dehydrated along with those we kept with us and consumed within the first 6 months to a year, those that had ended up in storage for more than a year were a bit more disappointing.  Overall, this worked wonderfully for short-term storage and is yet another great way of preserving the fruit and vegetable harvest from year to year.

Have you had similar experiences?  If so, I'd love to hear about them.


this post may have been shared at one (or all) of these wonderful blog hops!

Oct 6, 2014

How to can pumpkin


It's officially Fall now and I'm super excited.  I love everything about Fall, the cool crisp mornings and mild evenings; the explosion of color from the changing trees and most of all the homey smell of baked goods and foods being prepared for storage.  If there's one food that epitomizes the season for me it's the pumpkin.  Pumpkin Pie, Pumpkin Spice Lattes, Pumpkin Soup and mashed pumpkin with butter, brown sugar and cinnamon (think mashed potatoes only yummier!).  With all that pumpkiny goodness awaiting it was next to impossible for me to not want to store some up for the winter.  So off I went on a fact-finding mission to figure out how to can those lovely little bundles of Autumnal joy...  here's what I found.  Canning pumpkin really isn't all that difficult, sure it will take a little more effort and you'll need a pressure canner but otherwise it's pretty straight forward.  Let's get this little disclaimer out of the way first. The USDA recommends you do not home-can pumpkin puree, butter or pie filling; only can pumpkin cubes.  So, now, let's get to it!

First, what you'll need:

A pumpkin (of course) but not just any ol' jack-o-lantern pumpkin... you'll need a Pie Pumpkin.  These are a smaller, sweeter and less grainy textured pumpkin which you can either get at your local grocer, farmer's market or if you're lucky to have one near "pumpkin patch".

You'll also need:
A microwave, steamer or a baking sheet and oven.  I use a steamer since I don't own a microwave and the oven just takes too long for me.  Choose what works best for you.

A knife for cubing the pumpkin and preferably a serrated knife for cutting it open before you cook it.
A clean pot holder or oven mitt for holding the pumpkin while hot
Canning jars, lids and rims (properly sterilized with new lids)
Canning tools like the jar grabber/lifter, funnel and and a spatula or wooden spoon handle
A pressure canner large enough to accommodate the canning jars you've chosen and a timer.

Now for the fun part....

Step 1 - Get your pumpkin

Step 2 - Prepare the pumpkin for cooking: wash the exterior in cool or warm water - do not use soap! Cut the pumpkin in half with the serrated knife (a smooth bladed knife is more likely to slip and injure you) using a sawing motion. If you prefer use a small hand saw to cut through the tough skin.

Step 3 - Scoop out the seeds - use a melon baller or ice cream scoop to scoop out the seeds and stringy insides. SAVE THE SEEDS for replanting or roasting!

Step 4 - Cook it!  There are several ways to cook the pumpkin.  As I mentioned above I prefer steaming, but I'll list the methods below so you can choose what works best for you.

Method 1: Microwave
Remove the stem and put the pumpkin into a microwavable bowl, cut it into more pieces if the larger ones won't fit but remember that the fewer (and larger) the pieces the easier it will be to remove the skin later.  Put a couple of inches of water into the bowl and cover it.  Microwave in intervals until the pumpkin is tender - but DO NOT MASH or PUREE it.  Be very careful to keep the pumpkin in tact.

Method 2: Steam on the stove top
I use a double pot steamer but you can also use an ordinary pot with a steamer basket.  Place the pumpkin pieces into the steamer and steam for 20 - 30 minutes or until tender.  Again, be careful not to mash the pumpkin.  Save the cooking liquid, you'll use it for packing the jars later.

Method 3:  Baking in the oven
This method takes the longest.  Place the pumpkin cut side down in a covered oven-safe dish. Bake at 350F (200C) for 45 - 90 minutes or until tender.  Test periodically with a fork.

Step 5 - Prepare your canner.  Fill the pressure canner with at least 3" of water and bring to a boil.


Step 6 - Peel the pumpkin - The skin should easily peel off using a blunt knife in one hand and an oven mitt in the other.


Step 7 - Cut it - Cut the pumpkin flesh into 1-inch cubes (BE CAREFUL NOT TO SMOOSH THEM).

Step 8 - Pack the jars - fill the canning jars with your pumpkin cubes and fill them with the cooking liquid from steaming (or if you used a different method - boil a pot of water and use that) leaving 1" of headspace.  Place the hot lids and rings on the jars.

Step 9 - Let's get canning... Take your jar lifter/grabber tongs and place the jars onto the rack of your pressure canner.  If the water level has dropped below 3" add more hot water.  Put the lid on the canner but do not place the weight or close the valve (depending on your type of canner).

Step 10 - Let it vent.  Put the stove top heat on high and let the canner vent steam for about 10 minutes.  This purges the airspace inside the canner.

Step 11 - Put the weight on or close the valve to let pressure build.  Pressure should build to 11 to 13 pounds in a dial-type canner gauge or 10 to 15 pounds in a weighted gauge canner.

Step 12 - Process.  Once you reach the correct pressure, start your timer and process the jars for the required time.  I used 65 minutes for pint jars and 75 minutes for quart jars.  Adjust the heat as necessary to maintain a consistent pressure in the canner.  Also pressure requirements depend on the altitude.  Here is a chart to help you determine the pressure and processing times if you are above sea level.  Canning books or other online canning guides may have more helpful charts so keep that in mind.


Step 13 - Be Cool - After you've processed the jars for the required time, turn off the heat and let the canner cool down.  After the pressure drops to zero wait 3 additional minutes and then remove the weights or open the valves to allow remaining steam to vent.

Step 14 - Remove the jars and let them cool. - using the lifter/grabber tongs, remove the jars and place them on a wooden cutting board or towel to cool.  Do not touch or bump them.  After the jars have cooled you should check the lids to make sure they have sealed properly.


That's it! Now you have yummy, homey pumpkin for the winter.  You can eat them as is, puree them for pie filling or soup or you can mash them up like potatoes. Have fun!

P.S.  Remember to label your jars! Here are some lovely printable labels from JES at Strangers & Pilgrims on Earth.


featured at Front Porch Friday by Preparedness Mama;
Strangers & Pilgrim's Link UP Love and
A Gypsy Herbal's Warm & Cozy Fall Foods Roundup


this post may have been shared at one (or all) of these wonderful blog hops!

Sep 15, 2014

Preserving the harvest when you don't have a garden or orchard


How do you stock your pantry for the dark winter months ahead if, like us, you aren't living full-time on your homestead or you don't have the space or option to garden where you are?

Our solution?  "Pick Your Own" farms.  We are fortunate enough to have several orchards near us that offer very reasonable rates for gleaning your own fruits.  We try to take advantage of these as often as we are able.  We've mostly had success in getting loads and loads of apples and pumpkin but ours also offer pears, peaches, strawberries and cherries in season.


How does it work? If you aren't familiar with these, the concept is very simple.  You check the Pick-Your-Own website here to see if there are any in your area; then grab your family and as many friends as would like to tag along before heading to the closest farm or orchard.   Once there, you generally will be directed to the farm store or produce stand where you will be able to chose the amount you'd like to pick (for example: 25lbs is our standard but we could choose to get multiple 25lb bags and fill those if we wanted to.)  Once you make your selection you pay up and head out into the orchard.  The experience will vary depending on how large the operation is.  We have a mix of farms near us so some of them are relatively small and offer only a few varieties but others have a wide range available and require a drive-through in order to access the portions you want to pick from.  A map depicting the farm's layout and their varieties is generally available where you pay, make sure to grab one!  And that's about it, you get your bags and stuff them as full as you possibly can, put them in your car and head on home.  We've canned apple wedges, apple pie filling and apple sauce; not to mention dehydrating apple slices for snacking as well as drying the peels to use in tea.  We've also picked our own pie pumpkins from the pumpkin patch and made pie filling as well as canned pumpkin chunks.
a small part of our pick-your-own apple bounty
Having no option for gardening right now, we are very thankful to be able to do this.  If you have the opportunity to check one out for yourself I'd encourage you to go for it.  It's a great way to spend the day with your loved ones and do a little bit for your self-reliance and preparedness.

this post may have been shared at one (or all) of these wonderful blog hops!

Sep 8, 2014

Free Homesteading Information - where to find it and how to get it.


If there's one lesson that I've learned since we started on our homesteading venture, it's that setting up a 'stead doesn't come cheap.  While we focus on reusing and re-purposing items as well as searching for inexpensive alternatives, one area we've found can cause considerable cost is amassing a resource library.  Research and information is vital to us as neither myself nor Mr. Newbie come from agricultural backgrounds and as anyone who's gone looking for information at places like Amazon or Barnes & Nobel knows those books aren't inexpensive.  Local libraries and online sites can be a wealth of useful and much appreciated information but sometimes you just want to know where to go without looking through pages and pages of search results (or at least I do)... 

Well, look no further!  I stumbled across a wonderful resource for free farm and homesteading information and want to share it with you:  USDA Farm Bulletins!  Now I realize that these are older publications but the information in them is still very relevant to today's aspiring 'steader community.  You can find these to buy in paper form on eBay and other places but my favorite is a free online option for reading them via the digital library at the University of North Texas.  I'm in the process of saving links to those that are most interesting to us in our Library section as I discover them.  The University lists over 1800 results in the Farm Bulletin Serial so go ahead and check them out, I'm sure you'll find something that will be helpful to you, I sure did. 

If you'd like a bit more hands-on and personal experience you can do as my southern granny does and visit or call up your local county agent or county extension office.  These folks are a storehouse of knowledge for the home gardener and homesteader alike.  If (like me) you have no idea how to locate your extension officer you can do so by searching you're state on the "Pick Your Own" website here.
I've already found some very interesting and useful information on our specific locality via my local extension office's website (which is found with the office's contact details at the link above) and I'm sure we will be making even more extensive use of these guys once we make the full-time move to our property and start building up our homestead.

I'd love to hear your ideas and resources as well, feel free to leave them in the comments section below.


this post may have been shared at one (or all) of these wonderful blog hops!

Jun 30, 2014

Homesteading and Independence


The homesteading lifestyle has long been one of self-reliance and independence.  What better mindset than that of the homesteader to celebrate this upcoming July 4th. 

We are fortunate that the village we live in (although surrounded by urban wilderness) holds fast to small town values and family friendly ideals.  Each year they host a 4th of July celebration that begins with a parade and ends with music and fireworks in our river-front park.  It's something the entire town turns out for.  How about you?  What family traditions do you have to celebrate Independence Day?  I'd love to hear about them.

For now, from our homestead to yours...


this post has been shared at one (or all) of these wonderful blog hops!

May 19, 2014

Spring comes to our home on the range

 
Homesteading in the high desert presents its own unique challenges; however it also has its rewards – like the stunning scenery, peace and lots of open spaces!
We’ve just returned from spending a week on our property.  Spring has come to the northern range lands and we were happy to be able to experience a little of it during our stay.  May is the rainy season in that neck of the woods and desert life is abundant.  The constant winds carry the subtle smells of sage and pinion pine while the vast openness showcases the breathtaking mountains and beautiful blue skies.  Not everyone will see the beauty of this land, but its there for those who can appreciate it.  Wide-open range-land, beautiful desert wildflowers and snow capped mountain peaks as far as the eyes could see.  Standing on our soil, watching antelope dash by, I was reminded of the well-known song “Home, Home on the Range”.  I can see what drew people to this majestic land long ago because it draws us still. 
 
Home On The Range
 
Oh give me a home where the buffalo roam,
Where the deer and the antelope play,
Where seldom is heard a discouraging word,
And the skies are not cloudy all day.

Where the air is so pure, and the zephyrs so free,
The breezes so balmy and light,
That I would not exchange my home on the range,
For all of the cities so bright.


How often at night when the heavens are bright,
With the light from the glittering stars,
Have I stood there amazed and asked as I gazed,
If their glory exceeds that of ours.


Oh, I love these wild flowers in this dear land of ours,
The curlew I love to hear cry,
And I love the white rocks and the antelope flocks,
That graze on the mountain slopes high.


Oh give me a land where the bright diamond sand,
Flows leisurely down in the stream;
Where the graceful white swan goes gliding along,
Like a maid in a heavenly dream.


Then I would not exchange my home on the range,
Where the deer and the antelope play;
Where seldom is heard a discouraging word,
And the skies are not cloudy all day


May 12, 2014

The Homestead Project: Keeping your homestead pantry stocked (Part 2)


In the part 1 of this post I briefly outlined how we go about keeping our homestead pantry stocked.  In that entry I mentioned that we try to keep our supply runs to a monthly schedule.  Since we are not yet able to produce our own foods we are stocking up at our local grocer.  We are fortunate that our grocer offers online advanced ordering which can then be picked up in store.   This makes supply day a much more bearable experience here in the wilds of urban development.  With that in mind I thought I would share some of the staples that we keep in our pantry following the categories which I have listed on our Homestead Pantry and Freezer Inventory sheet.

Disclaimer:  While we try to eat healthy whole foods, we do not adhere to a strict organic diet.  We do utilize canned and frozen food (*gasp*) but try to monitor the ingredients lists on each item for such things as preservatives, sodium and high fructose corn syrup additives.  We are looking forward to the time when we will no longer be dependent on these mass-produced items, but understand that being well-stocked and prepared in our current situation requires some give-and-take.

 
So let’s dive in, shall we? 
We’ll cover staples in the following categories:  Pantry, Fresh + Frozen, Medicine Cabinet & Toiletry

 
Pantry:
·       Beverage + Mixes - Coffee, Assorted Teas (black, fruit + herbal), powdered drink mixes
·       Dressings/Oils/Sauces + Condiments 
·       Breakfast Grains + Cereals - oatmeal, grits, etc.
·       Canned Vegetables/Soups/Sauces - this includes pasta sauces
·       Canned Fruit
·       Canned Meat - tuna, chicken, spam etc.
·       Dried Beans + Soup Mixes
·       Pasta + Rice
·       Baking Needs + Supplies - flour, baking powder & soda, yeast etc.
·       Seasonings & Spices
·       Sweeteners/Syrups + Spreads - jams, jellies, honey and the like
·       Storage + Non-Food Supplies - trash bags, freezer bags, mason jars etc.
 
Fresh + Frozen
·       Breads/Tortillas/Wraps
·       Dairy + Eggs - cheese please!
·       Fresh Produce
·       Fresh Meats
·       Frozen Vegetables
·       Frozen Desserts - we do love us some ice cream!

Medicine Cabinet + Toiletry
·       First Aid + Sickness - adhesive bandages, cough & cold, sinus, stomach upset etc.
      ·       Hygiene – shampoo, soaps, toothpaste + brushes etc.
·       Routine Wellness + Vitamins - any supplements or medicines taken on a regular basis
·       Paper Products – feminine hygiene products, bath tissues, paper towels, napkins etc.

 
So now you see the type of things we try to keep in stock in our pantry, what do you have in yours?  I’d love to hear all about it.

This post was linked at: Homestead Barn Hop; Front Porch Friday Hop; Backyard Farming Connection;  HomeAcre Hop; Farmgirl Friday

Apr 28, 2014

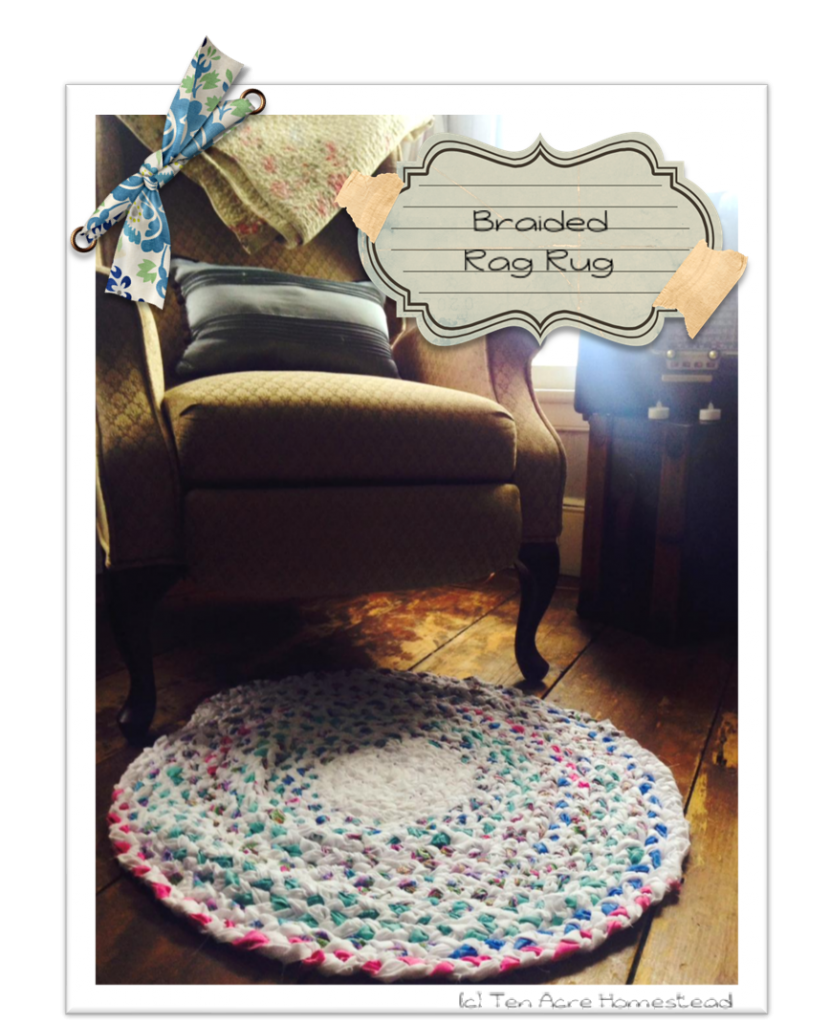
The Homestead Project: Braided Rag Rug


Braided Rag Rug


I finally finished my braided rag rug project this weekend.  I say finally, but really it was just my procrastination that made it take so long to complete.  This simple project came together quickly without any special tools or equipment.  I followed the tutorial by Moda Bake Shop here.
 
What you'll need:
1 honey bun of your choice
(I used a jelly roll instead since I couldn't find any honey buns in my local crafts supply shop)
4 yards of white fabric
Sewing needle
Cotton thread
Scissors
 
You'll start by cutting/ripping your white fabric into strips (width of fabric wise) to match the width of your honey bun or jelly roll fabric.  Once you have all of your strips of fabric you can begin.
 

preparing to join the strips
Begin by laying 1 white, 1 patterned (roll or bun) and 1 white strip next to each other.
Overlap the top ends and secure by stitching across then pin this in place using a safety pin so that it is secure when beginning your braid (see example in tutorial).  I secured mine to a pillow which I could keep on my lap and keep flipping to wind the braid as it progressed.  The tutorial shows the exact manner to connect the next strip to the end of the braiding strips.  Basically you will fold over the bottom end of the braiding strip, then you will make a small snip with scissors perpendicular to the fold.  Do the same to the top end of the next strip to be attached. 

Next you will line up the slits over each other with the new strip being on the top surface.  Take hold of the tail end/bottom of the new strip to be joined and bring the end up to the back of the previous strip of fabric.  Pull the end of the new strip through both slits and out the front.  Holding onto both strips by the slits continue to pull until you have the new strip almost completely through, then release the slits and gently pull until you have a small know (like that of a men's tie) joining both strips together. Continue in this manner until all strips have been braided.  IMPORTANT: Make sure to braid loosely.  If you braid tightly it will cause your rug to pucker and roll up when you begin sewing it together.
 

Once you have completed braiding all of your strips into one continuous braid, secure the end by stitching across it as you did at the beginning. (You can do this with a machine but it doesn't take very long by hand).
 
Here comes the exciting part: you're ready to start sewing it into a rug.  This is where I finally felt that the rug was beginning to take shape.
  
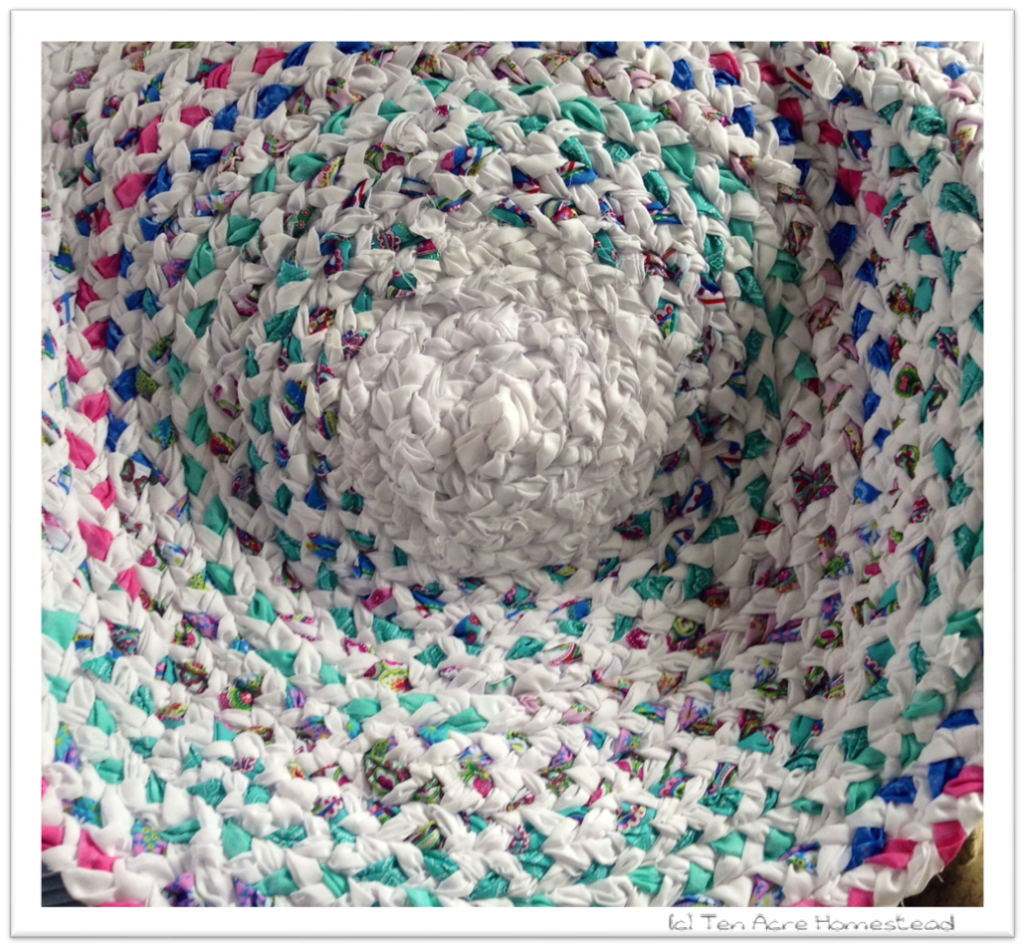
Take one end of the braid and begin by scrolling it into a flat cinnamon bun style roll.  Thread your needle and get to stitching!
 
I used a simple loop stitch through each side of the braid as I worked and it practically disappeared without a noticeable seam. Again there are really great pictures of this step in the tutorial.  Just follow its simple directions and you shouldn't have any trouble at all.
 
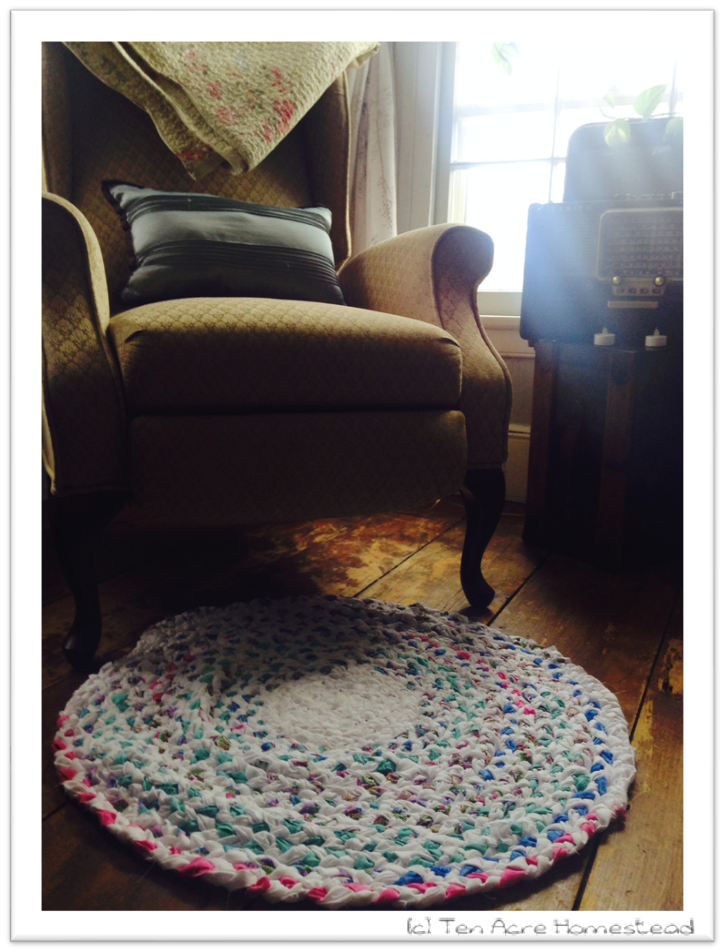
And here it is, the finished product!  What do you think?  Have you made one of these rugs before?  If so, I'd love to hear about your experience.
 

This post was shared at the following "hops":  Homestead Barn Hop, The HomeAcre Hop; Deborah Jean's May Sewing Party
Hop on over and join the fun!
 
http://www.oakhillhomestead.com/2014/05/homeacre-hop-69-and-day-4-of-my-blog.html
 

Apr 16, 2014

The Homestead Project: Keeping your homestead pantry stocked (Part 1)


Even though we haven't yet made the move to our rural property, we are cultivating a homestead right where we are by maintaining a prepared mindset.  One aspect of this is keeping a stocked pantry.  We try to do our major shopping once a month.  This is in part so that we spend more quality time in each other's company and less in a grocery store and also so that we begin to prepare for a time when the grocery store isn't a five-minute drive away. 


source: Home Depot
You don't need a lot of space to keep a well-stocked and well-prepared pantry.  We keep ours tucked away in a corner of our smallish spare bedroom.  This run-of-the-mill shelving unit that can be found at big box hardware stores everywhere has been just the ticket. 


Printable Version Here
In order to make the process of our monthly supply run less painful I've started to keep an overview of what we have and what we need.  This Pantry and Freezer Inventory list keeps us on track and helps us pick up a few extras to go towards our long-term preparedness stores.  I've filled ours in with the standard items and just go down the list at the end of each month.  This lets me know exactly how many of each item we have and how many we should put on our next shopping list.  I'll cover an overview of the items we like to stock up on in another post.  Feel free to use this form to help you with your pantry organization. 
 
How about you?  What tips do you have to help you stock up and keep your pantry organized?  We'd love to hear from you.


This post was linked at: Front Porch Friday Blog Hop